![Sabbe Interior Design [the blog]](https://blogger.googleusercontent.com/img/b/R29vZ2xl/AVvXsEgHQ5_KTbdz1o66OcpRfw3_Z6pbDdxuRw_aXtHMPiFXKZcJK9nwYI2lXE800EfPNL7E48Gtw484vGXefpKCPe15tGa_ULhYdHDXK01TL8XQLRd1LaOB1XGv0BbW3pMtybY0Ci-NcLmP1N6E/s990/header+1.jpg)
Onesie Cookies Tips
>> Sunday, October 5, 2008

Ok, I by no means invented this whole onesie cookie thing. I was inspired by many great examples seen here, here, and here. And I honestly thought it would be pretty easy. One of the more descriptive tutorials called for a pre-made dough, which ended up being my hardest thing to figure out. Little ole' Memphis doesn't have a store that sells good pre-made cookie dough that works well for cut out cookies. I found that out the hard way.
Tip #1
No regular store bought sugar cookie dough is going to work (by regular stores I mean Kroger, Publix, etc.) Unless the package says it's for "cut out cookies" it will not work. They just puff out when you bake them and loose all their shape. Starting from scratch was the way to go.
Tip #2
So for the cookies I tried several recipes. The one I liked the best was this one. They smell really good and I thought it was neat that it was a recipe from the 1940's. Thanks to everyone else who gave me recipes to try. They were good too!
I always bake these cookies on parchment paper. That way I don't have to worry about the way a greased pan will make my cookies taste and they never stick.
I got my cookie cutter here .
Tip #3
I made my own icing three times. Just use the Wilton Meringue Powder Mix Recipe. They have it in the crafts department at Walmart. Uhh, I hate that I just gave Walmart a plug on my blog...shop local, by local!...do as I say, not as I do.
My rational with what recipe to use was as follows; I think the Royal Icing recipe tastes better but it calls for raw eggs. And I was making these for a baby shower. And if I gave a pregnant person salmonella due to my baby onesie cookie icing I don't know what I would do with myself. So just buy the meringue powder if you are a worry wart like me.
Tip #4
Follow the Flow Icing directions in the meringue recipe box. Use a large paint brush, like 1" wide, square edge, and paint on the icing. And to help with this we have Miss Truly who has little shows on You Tube and gives way better tutorials than I could through photos. And I don't have a British accent.
Always remember when crafting, you're probably not the first person to attempt whatever project it may be. Google can be a great lifesaver when you are about to pull your hair out. I probably wouldn't have any hair right now if the Internet did not exist. Once again I say...how did our grandmothers do it?
Then use a fine piping tip and add whatever lines you like. Again, there are many Internet examples. Sometimes I like the simple one's better than the extra detailed ones. I used a metal tip and plastic bags I bought at a local baking store. My friend's mom uses a gun like this one and she says it's way better. It looks way better to me.
I used the gel (also at ___mart) to color the icing. I dipped it in a toothpick and then dipped it in my icing. It's way better than food coloring, the colors are much richer.
Tip #5
After you've iced them block out 4 hours to let them dry. Some people say their cookies dry in 45 minutes. My house must be moist or something because they took forever to dry hard, but they finally did.
Tip #6
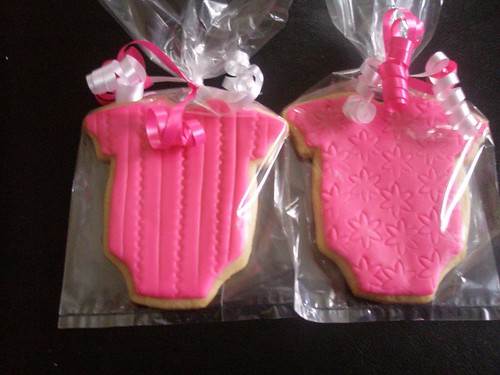
Wrap them up in plastic bags, put a bow on top, and pass them out as the cutest baby shower party favor ever.
Sorry it took so long to post these tips. It's been a whirlwind of a week. Not to mention my first week of being 27(ie. I'm slower)
